Detecting Virtualization
Background
A few months ago, I was listening to an episode of Tech Over Tea by Brodie Robertson, featuring Eric Parker as a guest. One part of their discussion that stood out to me was about the feasibility of VM escapes.
What really caught my attention was Eric's explanation of how malware detects whether it's running
inside a virtual machine (and basically not even bother if so). Among the various techniques he
mentioned, the most interesting one (to me) involved measuring the clock cycles required to execute
certain instructions, such as cpuid. If the execution time is significantly higher than expected
(e.g., 500), it's a strong indicator that the code is running in a VM. You can check out that part
of the discussion here.
Ever since, I had been meaning to try this myself but kept putting it off, until a few days ago. So in this post, I'll walk through the code I used to test this trick.
Hardware Virtualization
At first, you might wonder: wouldn't every instruction be slower in a VM since it runs on top of a hypervisor and requires emulation? Well, not exactly. Modern processors support virtualization extensions (e.g., Intel VT-x, AMD-V) that allow the hypervisor to run the guest OS directly on the hardware, avoiding the need for full emulation. This enables most instructions to execute at near-native speed.
That was my understanding too: under setups like QEMU+KVM, guest instructions should generally run
as if they were on bare metal. However, as Eric pointed out, some instructions are still emulated. I
have yet to explore all of them, but cpuid stood out as a good candidate to test.
TODO: how hardware virtualization works. and why
cpuidis an exception.
Measuring Clock Cycles
How do we measure execution time at such a fine level? In most benchmarks, we'd use a high-resolution timer provided by the OS. However, OS timers might not be precise enough for measuring a single instruction's execution. Instead, a better approach I had learned a while back is to use the Time Stamp Counter (TSC) provided by the CPU.
The TSC is a 64-bit register that increments with each clock cycle/tick (1 every CPU Hz)1. On
x86_64 processors, we can read the TSC using the rdtsc instruction. Executing the instruction will
store the current value of the TSC in the edx:eax register pair (lower 32 bits in eax and upper
in edx). So to get the complete 64-bit value, we will need to combine the two registers with some
bitwise operations.
We can use Zig's inline assembly features to
execute the rdtsc instruction, like so:
fn rdtsc() u64 {
    // higher and lower 32-bits
    var high: u32 = 0;
    var low: u32 = 0;
    asm volatile ("rdtsc"        // execute the instruction
        : [eax] "={eax}" (low),  // put value of eax in `low`
          [edx] "={edx}" (high), // put value of edx in `high`
    );
    // combine the two values
    return @as(u64, (@as(u64, high) << 32) | (low));
}
We can now use this function to measure the time taken to execute an instruction:
const start = rdtsc();
// execute the instruction
...
// find the delta
const cycles_taken = rdtsc() - start;
Using cpuid
Now, as for the cpuid instruction, Wikipedia has a really good article on it. But basically, its
usage depends on the value of eax before executing it. If eax is 0, it returns the CPU
manufacturer ID string in ebx, edx and ecx (among other things)2. So we can use this to
identify which processor we are running on.
Let's see an example usage:
const std = @import("std");
pub fn main() void {
    printVendor();
}
fn printVendor() void {
    var ebx: u32 = 0;
    var edx: u32 = 0;
    var ecx: u32 = 0;
    asm volatile (
    // EAX=0: Manufacturer ID
        \\xorl %%eax, %%eax
        // output to EBX, EDX, ECX
        \\cpuid
        : [ebx] "={ebx}" (ebx),
          [edx] "={edx}" (edx),
          [ecx] "={ecx}" (ecx),
        :
        : "eax"
    );
    const vendor: [4]u32 = .{ ebx, edx, ecx, 0 };
    const vendorStr = @as([*]const u8, @ptrCast(@alignCast(&vendor)))[0..12];
    std.debug.print("VendorID: {s}\n", .{ vendorStr});
}
Here's what running this code on my machine gives:
$ zig run cpuid.zig
VendorID: GenuineIntel
Combining the Two
So, after combining the knowledge we have gather so far, here's the final code for my TSC check:
const std = @import("std");

pub fn main() void {
    printVendor();
}

fn printVendor() void {
    var ebx: u32 = 0;
    var edx: u32 = 0;
    var ecx: u32 = 0;
    const start = rdtsc();
    asm volatile (
        // EAX=0: Manufacturer ID
        \\xorl %%eax, %%eax
        // output to EBX, EDX, ECX
        \\cpuid
        : [ebx] "={ebx}" (ebx),
          [edx] "={edx}" (edx),
          [ecx] "={ecx}" (ecx),
        :
        : "eax"
    );
    const end = rdtsc();
    const vendor: [4]u32 = .{ ebx, edx, ecx, 0 };
    const vendorStr = @as([*]const u8, @ptrCast(@alignCast(&vendor)))[0..12];
    std.debug.print("VendorID: {s}, took: {d}\n", .{ vendorStr, end - start });
}

fn rdtsc() u64 {
    var high: u32 = 0;
    var low: u32 = 0;
    asm volatile ("rdtsc"
        : [eax] "={eax}" (low),
          [edx] "={edx}" (high),
    );
    return @as(u64, (@as(u64, high) << 32) | (low));
}
Running this on my Ubuntu VM (top) and my host machine (bottom):
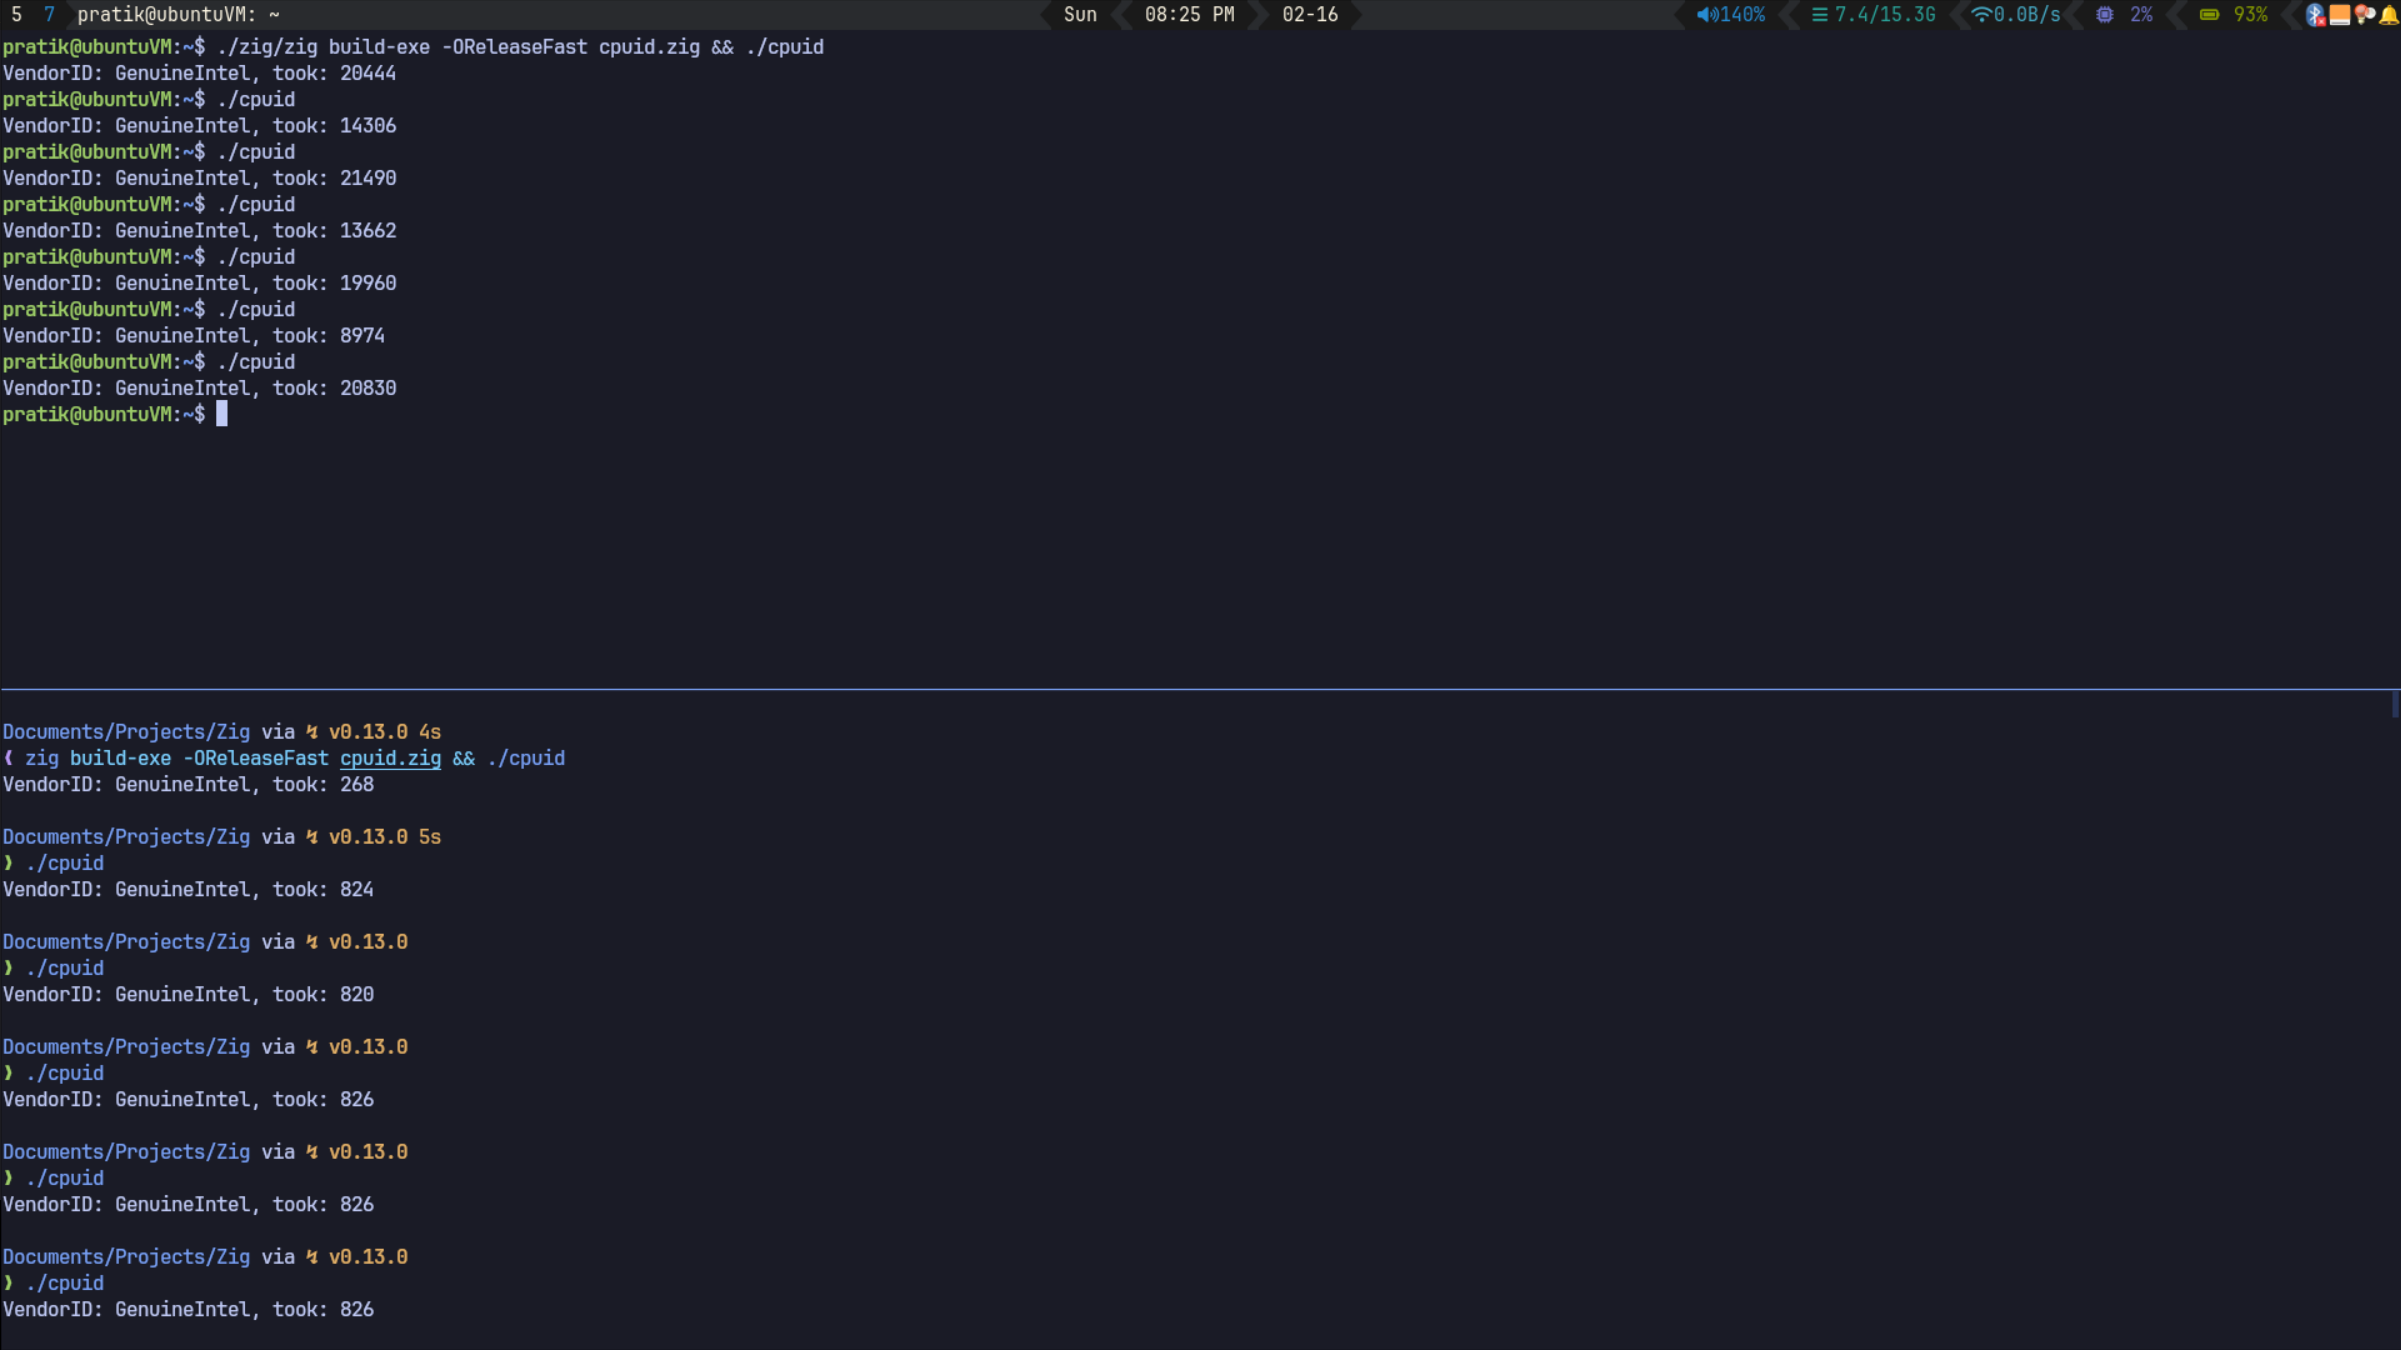
As expected, the execution time is significantly higher in the VM compared to my bare metal host.
Thanks for reading! I hope you found this as interesting as I did. I plan to dig deeper about this (for which I am deliberately leaving a TODO for now). So if you're knowledgeable about this topic or have any insights, feel free to contact me!